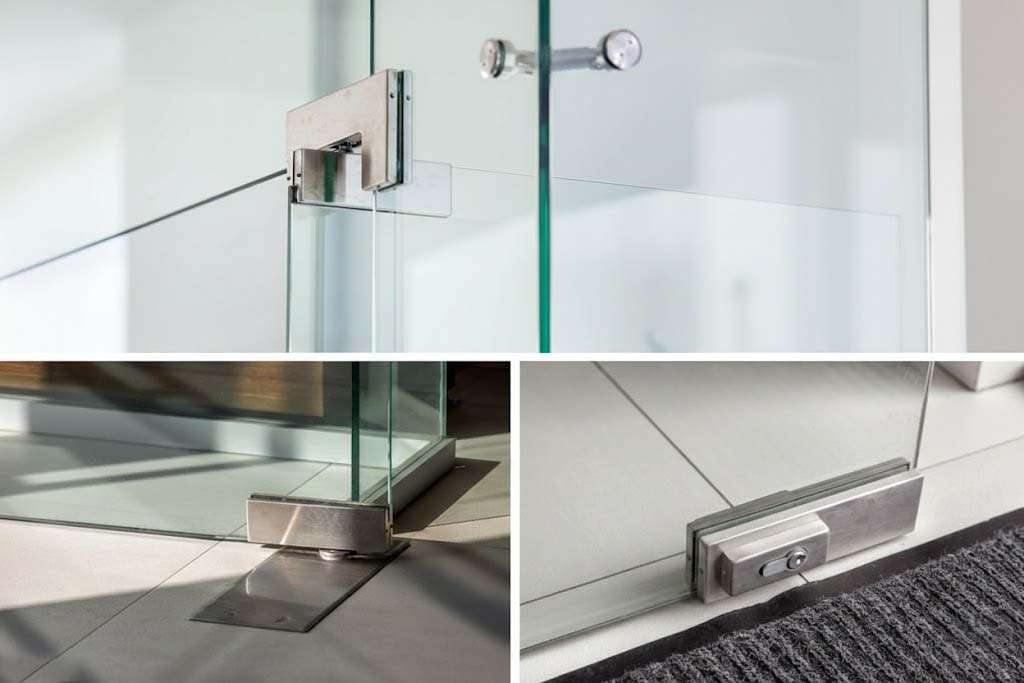
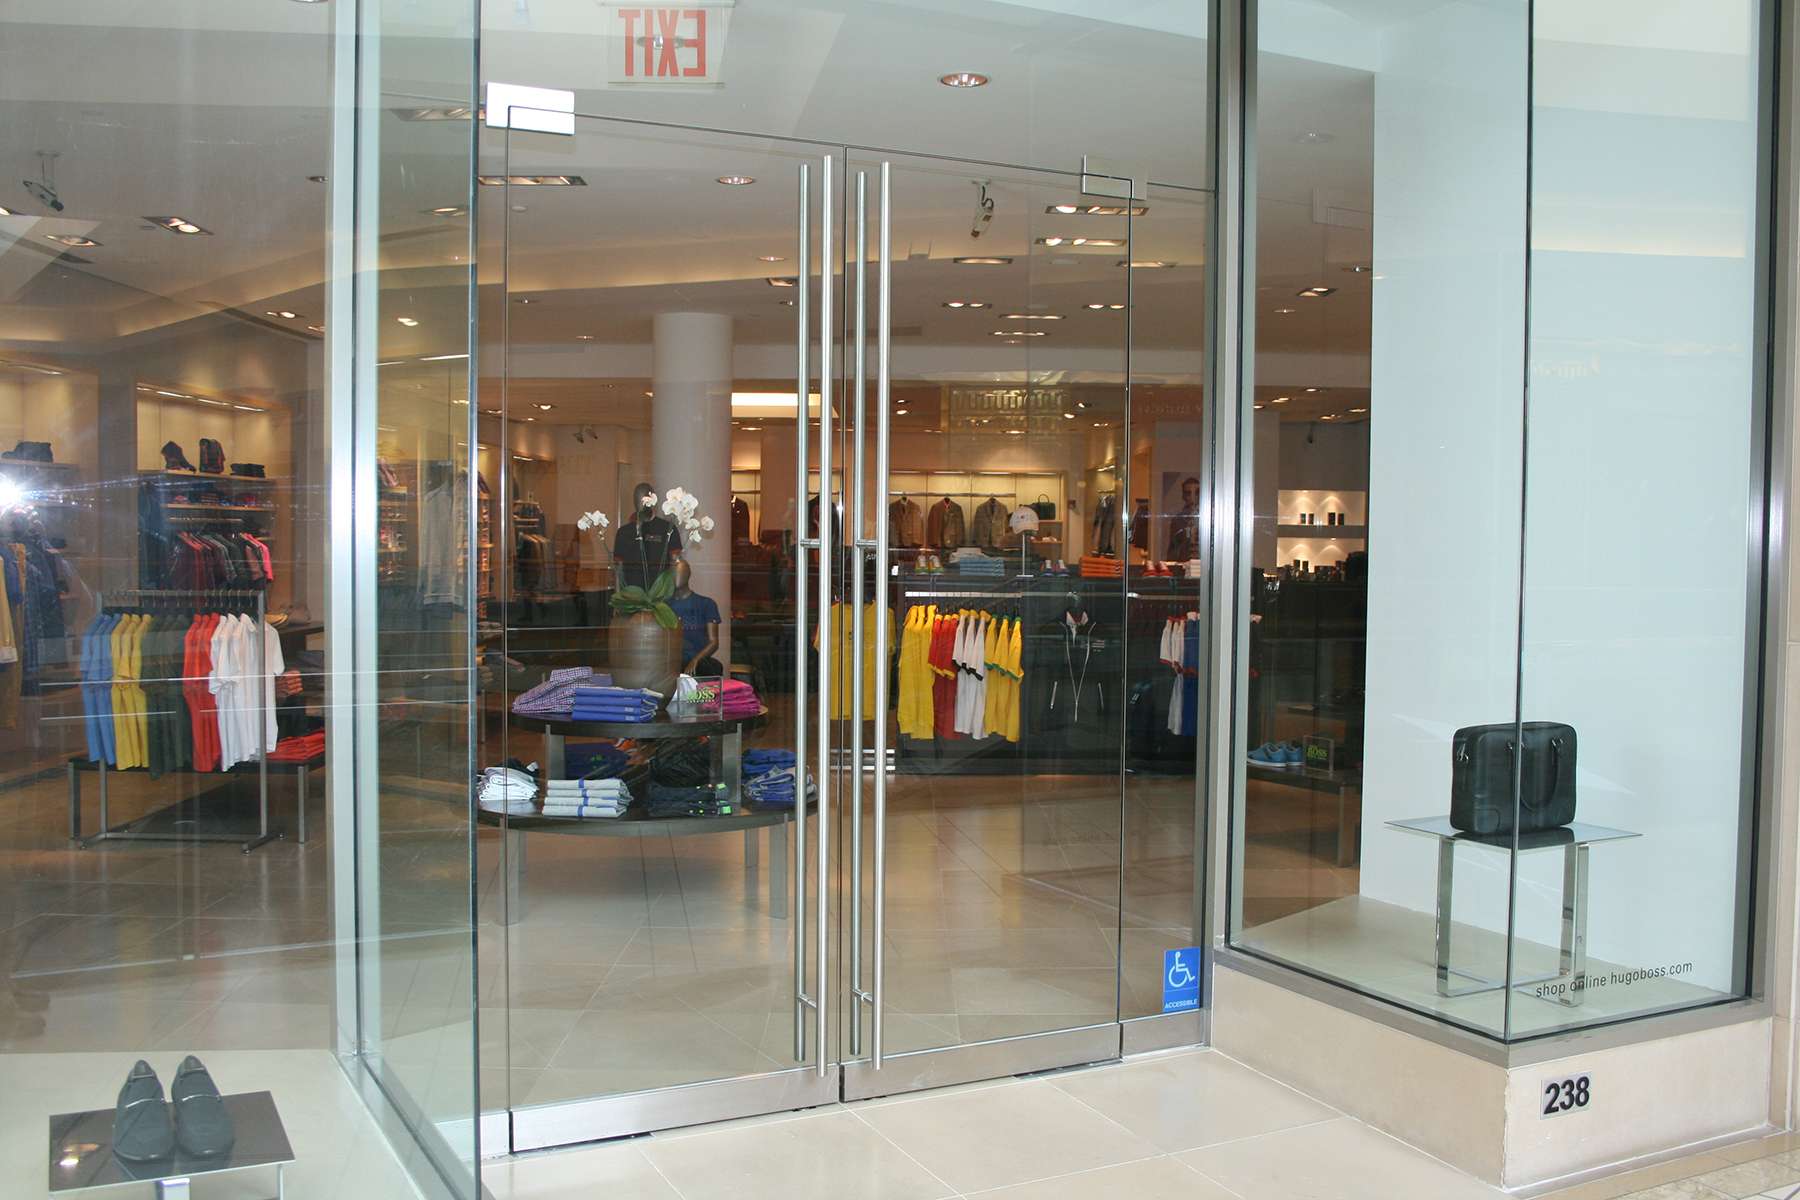
Patch fittings are clamp style fittings that mount at the top and bottom of a frameless glass door to connect it to pivots, a floor closer, and sometimes pulls. Patch locks are lock bodies that mount to the glass and latch into a keeper on a jamb, floor, or glass sidelite. Most commercial glass swing doors use patch fittings, while patch locks are only needed when you must secure or latch the door.
If you are buying for Canada projects, confirm glass thickness, cutout templates, and the receiving surface for the keeper before ordering. That prevents wrong prep and site delays.
Quick answers for specs and takeoffs
This section gives short definitions and order cues you can use in a schedule or RFQ.
What is a patch fitting
A patch fitting is a metal housing that clamps onto the glass near the top or bottom edge. It provides a strong connection point for pivots, a floor closer spindle, and sometimes hardware like pulls.
A common mistake is calling any glass clamp a patch fitting. Some clamps are for railings or showers and do not match door prep or functions.
What is a patch lock
A patch lock is a lock body designed to mount on a frameless glass door. It latches into a separate part called a keeper so the door can stay closed or be secured.
A common mistake is thinking the lock body alone completes the lock. Without the right keeper and a planned receiving surface, the lock cannot latch.
When you need both on the same door
You need patch fittings to hang and control a frameless glass swing door in most commercial setups. You need a patch lock when the door must latch shut, control access, or stay closed against pressure changes in the space.
A common mistake is adding a lock late after the glass is already cut. Patch lock cutouts and handle holes can conflict if they were not planned together.
What information to confirm before you order
Confirm door size, swing direction, glass thickness and type, and whether you are using a floor closer or a pivot set. If a lock is needed, confirm the lock function and where the keeper will mount.
A common mistake is sending only a photo and asking for a quote. A photo rarely shows glass prep, keeper location, or floor closer constraints.
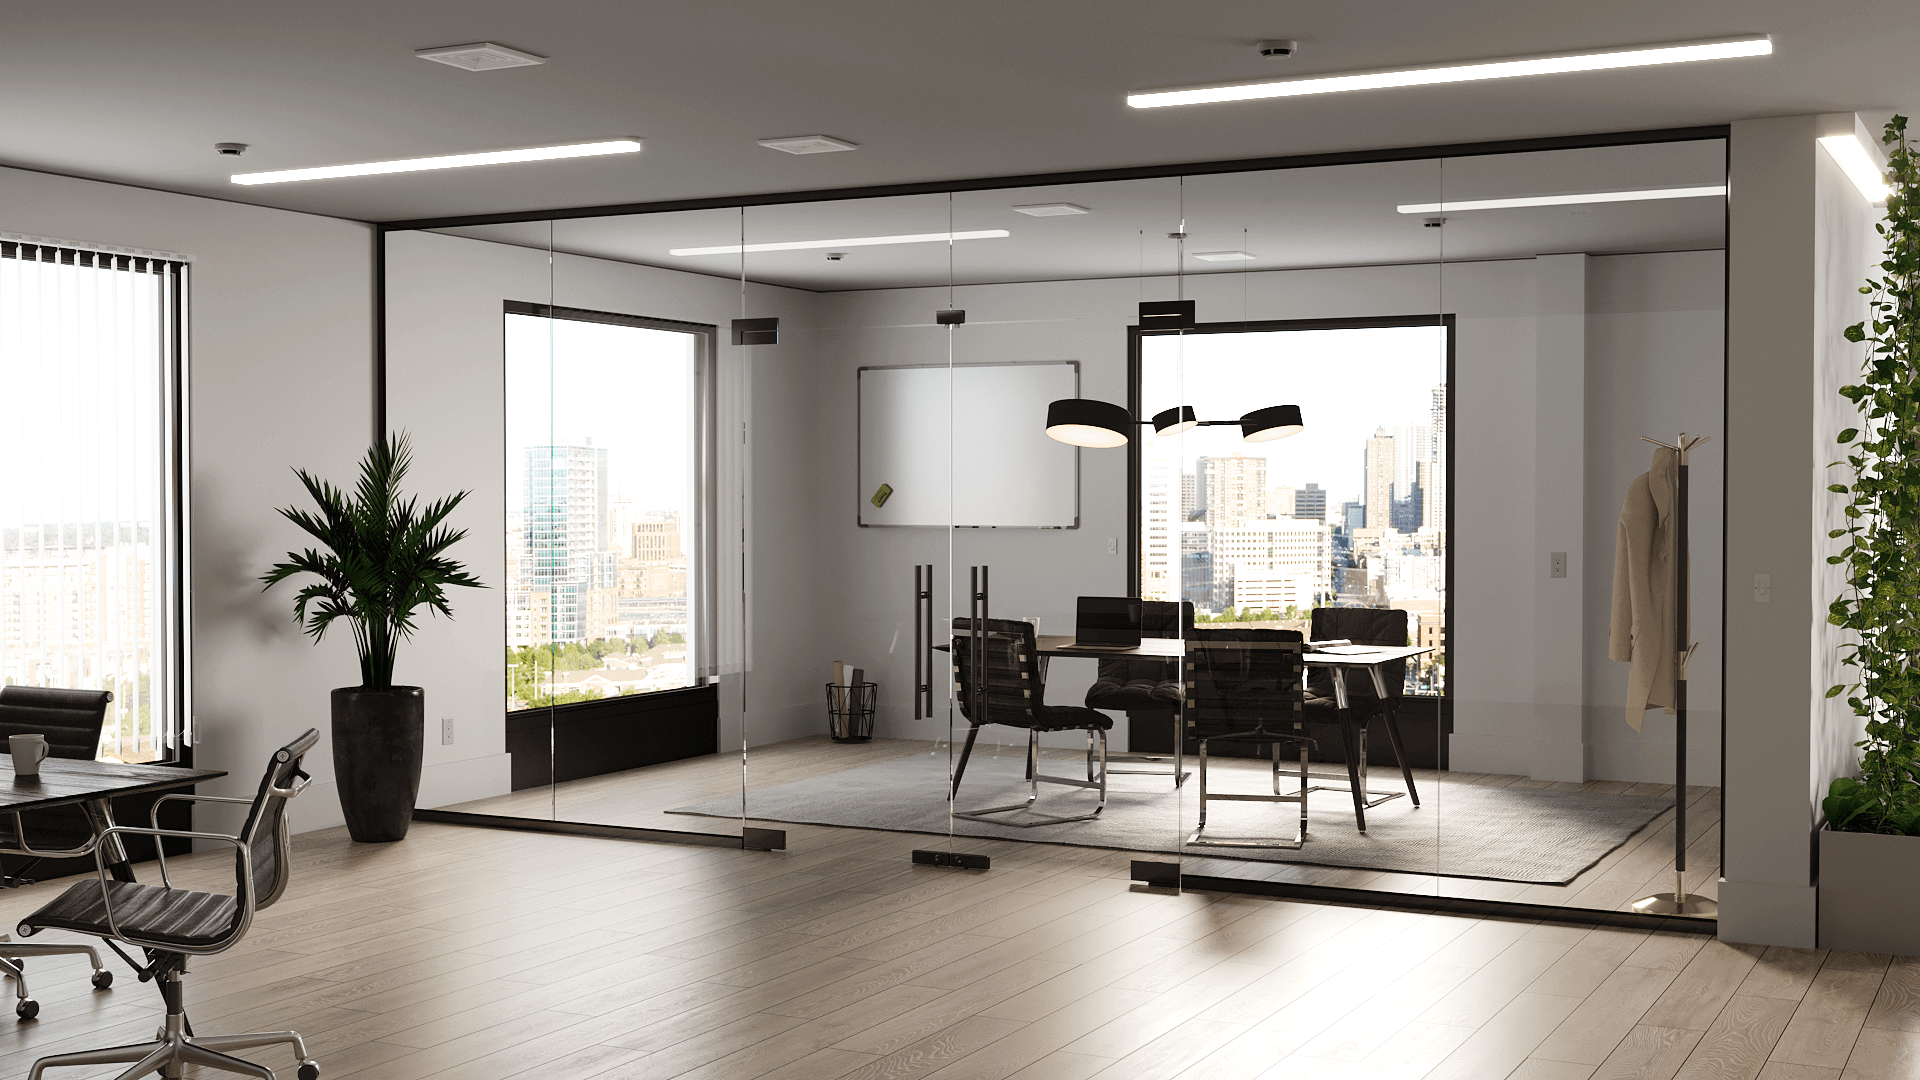
Patch fittings explained top patch and bottom patch
Patch fittings sit at the top and bottom of the door for a reason. They carry different jobs and connect to different parts of the system.
Before you choose anything, think in terms of the whole door set, not one fitting.
What the top patch does
The top patch helps locate the door and connects to the top pivot in many systems. It also helps keep the door stable during swing and reduces racking when people push or pull hard.
A common mistake is assuming the top patch is optional. On many frameless door sets it is part of the alignment and support plan.
What the bottom patch does
The bottom patch often connects to the floor closer spindle or the bottom pivot. It is central to door control because it transfers movement to the closer and supports the door at the floor.
A common mistake is choosing the bottom patch without checking the closer model and spindle position. Small differences can force rework at the floor.
Common patch fitting styles and what changes between them
Some patch fittings are for top only, some are for bottom only, and some are designed to accept specific pivots or closer spindles. The shape, mounting points, and glass cutouts can vary by series and by function.
A common mistake is mixing parts from different series because they look similar. Cutout templates and pivot centers may not match.
Mistakes that cause loose fit and poor alignment
Loose fit often comes from wrong gasket thickness, wrong glass thickness range, or uneven clamping. Poor alignment often comes from wrong pivot spacing, wrong cutouts, or installing patches before confirming the door gaps.
A common mistake is over tightening to fix a fit issue. If the gasket and glass are not matched, tightening harder can create uneven seating.
Patch locks explained lock body and keeper
Patch locks are about latching, not hanging the door. They solve a different problem than patch fittings.
If you plan the lock early, the rest of the set becomes easier to coordinate.
What the lock body does
The lock body houses the latch or bolt and provides a place for the cylinder or thumbturn if required. It mounts through or around the glass depending on the lock design, and it must line up with the keeper.
A common mistake is choosing a lock body based on appearance only. Function and keeper location matter more than the face shape.
What the keeper does
The keeper is the receiving part that the latch or bolt closes into. It might mount on a wall jamb, a floor strike plate, or a glass sidelite depending on the layout.
A common mistake is forgetting that the keeper needs a solid mounting surface. If the receiving surface is weak or out of plumb, latch alignment can drift.
Common lock functions used on glass doors
Common functions include passage with latch only, key cylinder entry, and deadbolt style locking. Some projects need privacy on interior doors, while others need after hours security at an entrance.
A common mistake is selecting a lock function that does not match how the door will be used. For example, a door that must stay latched for air pressure control will frustrate users if it behaves like a free swing passage door.
Mistakes that cause latch issues and callbacks
Latch issues often come from poor alignment between lock body and keeper, wrong gap planning, or movement in the receiving panel. They also come from last minute changes to pulls that interfere with the lock throw.
A common mistake is treating the keeper as a small add on. The keeper choice drives the whole lock plan.
How to tell which part you are looking at on site
On site, many parts look similar until you know where to look. Location on the door and what it connects to usually tells the story.
This section helps you avoid ordering the wrong replacement part.
Where top patch and bottom patch sit on the door
Top and bottom patches sit near the top edge and bottom edge of the glass, usually centered on the pivot line. They often have openings or hardware features that connect to pivots or closer spindles.
A common mistake is assuming a patch from another door will fit because it is the same size. The internal geometry can be different.
Where the lock body sits on the door
A patch lock is usually mounted at a comfortable hand height on the latch side of the door. It often aligns with the pull hardware and the strike location.
A common mistake is placing a lock where it conflicts with the pull or where the user cannot comfortably operate it. Coordination with handle placement prevents this.
Where the keeper mounts and what it mounts to
The keeper mounts on the surface that receives the latch or bolt. That can be a jamb, a floor plate, or a glass panel with a clamp style keeper.
A common mistake is assuming the keeper mounts wherever there is space. The keeper needs the right line up and the right support.
Mistakes when parts get mixed between doors
Mix ups happen when projects have multiple door sizes or different closer models. A bottom patch from one opening can look identical but have a different spindle position or glass cutout.
A common mistake is labeling parts only by room name. Label by opening number and include the hardware series.
How the parts work together in a complete glass door set
Patch fittings and patch locks are not separate shopping lists. They are parts of a system that must share a common pivot line, cutouts, and clearances.
If one part changes, glass prep and alignment can change too.
Patch fittings and pivots or floor closers
Patch fittings connect the glass to the pivot points and to the closer if there is one. In many commercial doors, the bottom patch and floor closer work as a pair, while the top patch connects to the top pivot.
A common mistake is specifying the closer after the patches. The closer choice often drives the bottom patch and floor box planning.
Patch locks and pulls and strikes
Patch locks must be placed where users can operate them and where the keeper can be mounted. Pulls must clear the lock body and allow a natural grip without hitting edges or hardware.
A common mistake is selecting long pulls that overlap the lock body or reduce finger clearance. A quick clearance check avoids site changes.
Glass prep cutouts and why they matter
Glass prep includes cutouts for patch fittings, holes for pulls, and any cutouts needed for a lock body. These cutouts are difficult to change after fabrication, so templates must be confirmed early.
A common mistake is letting the fabricator assume a standard cutout. Standards vary by hardware series and model.
Mistakes from mixing brands and series
Mixing brands or series can lead to cutouts that do not match, mismatched pivot centers, or parts that physically interfere. Even if parts can be installed, performance and alignment can suffer.
A common mistake is sourcing a lock from one supplier and patches from another without confirming template compatibility.
Common use cases and which parts matter most
Different jobs put different stress on the spec. The same patch lock might be fine in one context and a headache in another.
Use cases below focus on what teams in Canada projects often need to confirm.
Commercial entrances and lobby doors
Entrances usually need controlled closing and a clear access plan. Patch fittings and the closer plan come first, then lock function and keeper mounting, then pulls and finish.
A common mistake is planning the lock but not planning the closer box and floor conditions. Many entrance delays start at the floor.
Office partitions and interior doors
Interior partition doors may need quiet controlled closing and sometimes privacy. Many do not need key access, but they still need a latch plan if the door must stay closed.
A common mistake is ignoring door stops and letting glass hit glass. Stops protect the door and reduce stress on patches and locks.
Storefront retail fit outs
Retail fit outs often want a clean look, fast lead times, and reliable security after hours. That makes series consistency and keeper mounting quality important.
A common mistake is leaving keeper mounting to the last week. If the receiving surface changes, the lock plan may need a redesign.
Showers railings and sliding systems where patch locks are not typical
Showers usually use hinges and latches designed for wet areas, not patch locks for commercial entrances. Railings use clamps or base shoe systems, and sliding doors use tracks and rollers rather than pivots and patches.
A common mistake is using the word patch to describe every glass clamp. The best result comes from matching the hardware family to the job.
A simple selection process for Canada projects
This section gives a short repeatable process you can use on most frameless glass swing door specs. It is designed to reduce missing parts and cutout mistakes.
Keep the steps in order and your RFQ will be much cleaner.
Step 1 confirm door layout and swing
Confirm single door or pair, and confirm swing direction and handing. Note push side and pull side and how people approach the opening.
A common mistake is relying on verbal descriptions. Add a marked plan view or a quick sketch.
Step 2 confirm glass thickness and prep requirements
Confirm glass thickness and type with the fabricator and confirm the required cutout templates for the chosen series. Make sure the cutouts cover patches, lock body if needed, and pull holes.
A common mistake is confirming thickness but not confirming the cutout template. Those are different decisions.
Step 3 choose patch fittings and closer or pivot method
Select the patch fitting series and decide on floor closer versus pivot set. Coordinate with the installer on floor conditions and timing if a floor closer is used.
A common mistake is selecting a floor closer after floor finishes are set. Floor planning should happen early.
Step 4 choose patch lock function and keeper location
If a lock is needed, select the function and decide where the keeper mounts. Confirm the receiving surface and confirm any strike prep needed.
A common mistake is choosing a lock function that requires a keeper type the opening cannot support.
A short process you can paste into a spec note
- Confirm layout and swing
- Confirm glass thickness and cutout template
- Select patch fitting series and closer or pivot method
- Select lock function and keeper mounting surface
- Confirm handle holes and clearances
- Review the set with fabricator and installer before glass is cut
This is simple, but it prevents most avoidable site issues.
Compatibility checks before you order
Before you place an order, run these checks. They help procurement avoid last minute substitutions.
They also help installers avoid field fixes.
Confirm the patch series and cutout template
Ask for the exact cutout drawings or templates tied to the patch series and models. Confirm that the fabricator will cut to that template and not a generic one.
A common mistake is assuming the series name is enough. The model number matters.
Confirm keeper type matches the receiving surface
Confirm if the keeper mounts to a jamb, floor, or glass. Confirm how it will be fixed and whether the surface will be ready at install time.
A common mistake is selecting a keeper for a jamb when the final design uses a glass sidelite. That can change the whole lock plan.
Confirm handle holes and clearances near the lock
Confirm pull hole spacing and confirm clearances between pulls, lock body, and patch housings. On narrow doors, this is a common conflict point.
A common mistake is changing the pull after glass is cut. That can create unused holes or forced handle compromises.
Mistakes that create last minute rework
Rework usually comes from mismatched cutouts, missing keeper planning, and mixing series. It can also come from floor closer conflicts discovered late.
A common mistake is allowing substitutions without checking templates. A substitution can be fine, but only if cutouts match.
What to include in your enquiry for a complete set
A good enquiry makes quoting faster and reduces wrong assumptions. It also shows you are planning the project responsibly.
Use the checklist below to keep it short and complete.
The minimum details suppliers need
Provide door count, door size, swing direction, glass thickness, and whether you need a closer and a lock. Provide the project location in Canada and the finish preference.
A common mistake is leaving out the closer plan. Suppliers need to know the closer or pivot method to complete the set.
Drawings and photos that prevent wrong assumptions
Send a marked plan view, a door schedule line item, and photos of the opening if it is a retrofit. Include notes on the receiving surfaces and any constraints like radiant floor heating if known [source needed].
A common mistake is sending photos without measurements. One photo plus a few key dimensions is far more useful.
A short checklist you can paste into an email
- Opening name and door count
- Single door or pair
- Door width and height
- Glass thickness and type
- Swing direction and handing
- Floor closer or pivot method
- Lock needed yes or no and function
- Keeper mounting surface jamb floor or glass
- Pull type and hole spacing if known
- Finish preference and Canada delivery location
If you send these items, you will get fewer questions and a clearer quote.